页面

2017/9/11

Tutorial: Edgy Fall Nail Design


Fall nail designs can be bright, edgy and utterly chic! Case in point, take this minimalist manicure with geometric shapes. While white is typically perceived as a summer (or winter) colour, the four different shades of brown used to create the details and gold studs transform this manicure into a perfect Fall nails look. A great bonus, it is also very easy to do! Check out the nail art tutorial below…
By the way, this Fall design was created for the Fall Nails challenge. I took inspiration from the classic Fall colours but wanted to make it all look fresh and chic, rather than moody. Well, I’m quite happy how it all turned out. There’s certainly nothing melancholic about this edgy Fall nail design ;) and I can’t wait to see what Fall nail designs you’ll create during this challenge! If you haven’t heard about it yet, here’s all the info on how you can join in.

How-to:

  1. Paint all nails white and wait until nail polish is dry. Attach wide tapes on all nails as pictured.
  2. Fill in the areas within the tapes with different shades of brown nail polishes
  3. Accurately remove the tapes.
  4. Add metallic studs and seal it all with 1-2 layers of a matte top coat.

Now, over to you!

How do you like this edgy Fall nail design?

2017/9/10

Hawaiian Flower Nail Art Tutorial


The holiday mood is in full swing at SoNailicious HQ. In just 20 days I’m going to be sipping pina coladas by the beach. Even though it’s cold in Sydney right now, I’m already imaging myself wearing Hawaiian print shirts. So why not to join me on my imaginary (for now) vacation and try this Hawaiian flower nail art?
It’s relatively easy to do, but you’ll need a detailing nail art brush, dotting tool and a bit of practice in creating thin tiny lines and dots. I’d suggest you try to replicate this flower pattern on a nail wheel or even on paper before starting it on your nails to get confident with the pattern. Now, without further ado, here’s the how-to!

HOW-TO:

  1. Apply 2 coats of orange polish (or another bright colour of your choice) on all nails. It should be completely opaque. Without waiting for your polish to dry, proceed to the next step.
  2. Using the largest dotting tool and white polish, dot silhouettes of the flowers-to-be on all nails.
  3. Using the same dotting tool or brush, fill in  the white flower silhouettes with white polish.
  4. Using the thin detailing nail art brush, draw tiny orange lines on the white flower silhouettes, ie. separate/outline the petals as pictured. Do it on all nails.
  5. Using the same nail art brush, add orange details onto the petals and add the center of each flower as pictured.
  6. Using the smallest dotting tool with white polish, add groups of 2-3 tiny dots on each nail, as pictured.
  7. Allow 15 minute for your design to dry (clean up around cuticles while waiting), then apply 2 coats of clear top coat to seal and smooth the design.
So, what do you think about this Hawaiian flower nail art? Are you planning a holiday somewhere special?

2017/9/7

A Must French Nail Art - Fashion Icon

French nail is not to show off but unique style to make it swept the world, become the common nail language of the world.

French manicure features: Production is simple, fast, making a short time, but feel fresh and elegant.

Today I will show you a must French Nail Art - Fashion Icon, simple french nails will be able to firmly attract everyone's attention.

1. Apply a layer of clear base coat to the nails.


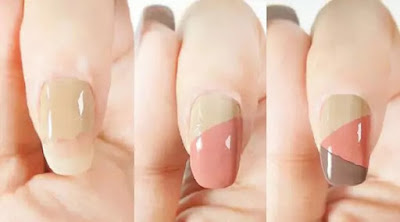
2. Near a half of the root of the index finger, painted green brown nail polish, and then diagonally coated with dark flesh pink nail polish, and finally apply the remaining part of the nails with a layer of dark brown nail polish from the other direction. You can also use the nail art stickers to draw a straight edge easily, and later steps can do it.


3. Painted green brown nail polish to middle finger, and then painted brown nail polish at the 1/2 part of the fingertips.


4. Little finger and thumb repeat step3.


5. Stick gold nail strips at the edge of two colors of nail polish in the little finger, middle finger and thumb.


6. Painted a layer pf flesh pink nail polish on the ring finger.


7. The ring finger is attached to a triangular golden rivet. Finally, apply a layer of transparent top coat to all nail surfaces. 


So easy to get your french nails done, have a try!

2017/9/6

DIY Dried Flower Nails Step by Step

Last time I share 10 Extreme Elegant Dried Flower Nails to you, today I will tell you how to DIY Dried Flower Nails Step by Step.

Mention the flowers, people's feelings are beautiful. Flowers represent hope and beauty, but fresh flowers will eventually wither, only dried flowers can be permanently preserved.

The beauty of dried flowers is different from fresh flowers, who does not want to be beautiful forever? So Dried Flower Nails, worth to try!


Step by Step:
1. Polish and clean the nails, apply a layer of base coat, then apply nail glitter powder, of course you can choose your favorite color to base.


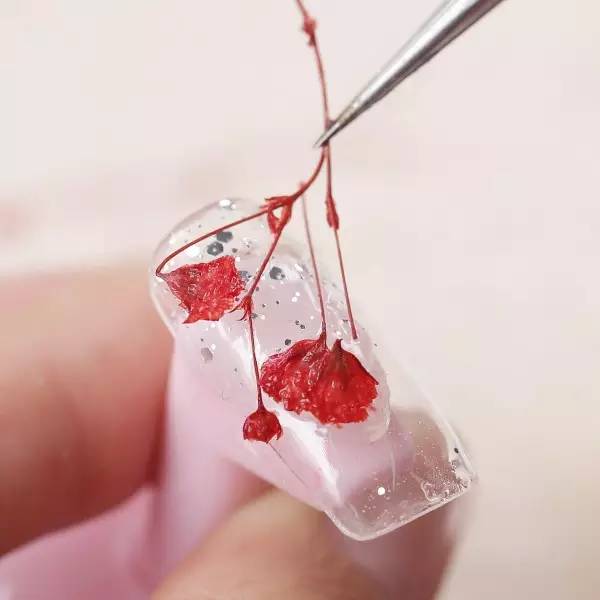
2. Apply a layer of UV Gel Polish, take appropriate amount of dried flowers, use tweezers to gently press the flowers on the nails.


3. Cut off the excess part with scissors, press the the flowers to close to the nails, cure under the UV LED lamp. After it dry, paint another layer of UV Gel Polish, cure under the UV LED lamp.


4. Polish the nails smooth with a nail file, then clean the dust on the surface with cotton wipes with alcohol.


5. When everything is completely dry, you should lock the decoration with a thick layer of top coat nail polish. Done!


TIPS:

Slightly soak with water before using dried flowers

Use a paper towel to squeeze excess water


2017/9/5

10 Extreme Elegant Dried Flower Nails for 2017

Flowers are essential elements all year round, seal the dried flowers in the nails, not only retain the best color and shape of flowers, but also let the fingertips exudes a thick romantic atmosphere.

Dried flowers do not like the real flower with vigorous and prosperous, full of life power. Such as a disappearance of the woman's photo, leaving the young face but lost the young fragrance, life with the passage of time, but with another way, after the soul drift away, leaving a beautiful shell. As if you can always and forever, as if you can always accompany comfort, at your fingertips.

Dried flower nail is very popular, because it is more three-dimensional, fresh and natural than the hand-painted flowers.

Would you like to leave beautiful petals on your fingertips?

Today I want to introduce you 10 Extreme Elegant Dried Flower Nails for 2017.

Dried Flower Nails

Dried Flower Nails

Dried Flower Nails

Dried Flower Nails

Dried Flower Nails

Dried Flower Nails

Dried Flower Nails

Dried Flower Nails

Dried Flower Nails

Dried Flower Nails

2017/9/4

Pros and Cons of UV Gel Nail Polishes

The UV gel nail polish is a long-lasting and beautiful way to pamper the nails. This type of polish is easily applied at home with the right equipment, such as a LED lamp or UV lamp. By using this type of polish it is possible to avoid issues related to cracked or chipped nails.

UV Gel Nail Polish


Pros

Long-lasting - A major benefit of this polish is the ability to last a lot longer than the alternatives. Once applied, the polish has the potential to last for a period of three to four weeks. Most other types such as acrylic based polished can start to appear worn over a period of one week.

Natural look - This type of polish gives a high-quality finish and appears with no scratches or dents. Plus, it has a finish that looks a lot more natural looking than the acrylics.

Easy to use - The process of applying UV gel nail polish is very easy. The UV gel is applied to the prepared nails to give a great base for the polish. It should be given enough time to fully dry with the help of an LED lamp or UV lamp. Once the first coat is dry, it is possible to apply the actual polish which takes a couple of minutes to dry. A second layer of polish can be applied to give the brighter shine and longer durability.

Quick to remove - This type of polish is relatively quick and easy to remove. Simply soak the nails in a preferred acrylic remover and the entire layer of polish should be easy to clear. Plus, there is rarely a need to take extra steps like filing or grinding.

Cons

Harmful to your skin - The regular use of this polish may have a negative impact on the skin. This is mainly related to the repeated use of LED lamps or UV lamps that have the potential to lead to skin cancer. To limit this harmful exposure it can benefit to apply a preferred sunscreen lotion around the nail cuticle and fingers.

Lack of natural light - The constant use of artificial nail covers can limit the ability for natural light to reach the nails which is beneficial for proper growth.

Drying process - The drying process for the polish isn't the most comfortable because of the heat that comes from the LED lamp or UV lamp. It is practical to use the small fans to minimize issues with discomfort.

2017/9/3

The Types Of Nail Polishes

Nail polishes have been around even before I was born. A swipe of color on your nails bring a new dimension to your style. With the advent of various nail arts and YouTube videos allowing access to many creative options, you can virtually create many designs on your nails. However, for those of you who are just starting out with nail polish, you might get confused with certain names and types. With that being said, here's a 101 on the types of nail polishes.

nail polish online


TYPES OF NAIL POLISHES

1. Finishes

Nail polishes come in different finishes. They range from matte ones to glittery ones. Matte polishes are those polishes that has little or no shine in them, and they often look flat. They are one of the most classic polishes that one can pick up. If you are a big fan of classic polishes, then this is recommended for you.

Cream and Pearl Finishes contain a little shimmer that reflects beautifully when light is shone on them. They are a step above the matte polishes. Cream and pearl finishes are one of my most favorite types.

Metallics are those that appear metallic or foil-like on your nails. The most common colors are gold, bronze and silver. They are great on those days where you want to feel glamorous.

Glitter polishes are the type of polishes that just spell glamour. They come in different textures and patterns. Some polishes contain finely milled glitters and some contain chunkier ones. The only downside of glitter is that it is really difficult to remove.

2. Base Coat

A base coat is essential in preparing the nails for color. It protects them from discoloration that is brought about by bold colored polishes. A base coat often comes as a colorless finish. You can get a base coat that contains nail strengthening elements that would help keep your nails strong.

3. Top Coat

A top coat is what you put on top of your colored polish. It helps prevent nails from chipping and it also adds additional shine on your nails.

4. Quick Drying

If you don't want to spend so much time painting your nails and waiting for them to dry between layers, a quick drying polish is the right choice for you. It is still recommended to allow at least 15 minutes of drying time, in order to avoid any annoying nicks and dents. Remember that the thinner you apply your polish, the faster it dries.

5. Growth Enhancing

For those who have dry and brittle nails, a growth enhancing nail polish will help keep your nails strong. They contain proteins and fibers that aid in faster and healthier nail growth.

Before you head out and stock up on your favorite polishes, find out if you have any problems with your nails. All it needs is just a little TLC. You may choose to treat your nails and remember to allow at least a couple of days for them to breath before applying your next nail color.